HTML 5 - Easier and faster

Go to Blogger edit html and find these sentences.Now replace these sentences with your own descriptions.This theme is Bloggerized by Lasantha Bandara - Premiumbloggertemplates.com.

Ubuntu - One of Linux Distribution

Ubuntu is a Linux distribution operating system software, meaning that it runs using Linux applications, kernels and libraries. Ubuntu is developed and sponsored by Canonical, Ltd., a South African company that is founded and funded by Mark Shuttleworth.

JavaScript Introduction

Ryan Paulin When dealing with website development, there is lots of scripting language that you can choose from depending on how you want to develop your website. You can use AJAX, HTML, CSS.

Acquainted with CSS ( What is CSS ? )

CSS stands for Cascading Style Sheets. If you read in the dictionary, cascading is similiar with waterfall. But in this case, it means the flow from one code to another code that are interconected. So it can be concluded, CSS is a collection of codes that are consecutive and interlinked to set the format / display an HTML page.

What is Linux ?

Linux – the operating system for a GNU (pronounced Gnew) generation. It has been dubbed the alternative to Microsoft, the solution to all life’s problems and many other things that may or may not be true. But what is Linux, and should you care?

Tampilkan postingan dengan label xampp. Tampilkan semua postingan

Rabu, 03 Agustus 2011

Installing XAMPP and AppServ in Windows Operating System

Okay, this time we will try to install xampp or AppServ on your PC or Notebook with Windows Operating System in it. This post relates to my previous post "Reviewing Web Server Package". So if you do not know about web server package, please see that posting. You can also get the download link of the Webserver Package Installation.

To the installations step, just follow the steps below. I'll try to make it easy as possible. Check this out. :)


After you finish downloading the webserver package either XAMPP or AppServ, double clik it.

XAMPP Installation
  1. After you got the installation menu, specify wich drive will be installed by Xampp. Better let it remain on drive "C: /". Then click install:

  2. Wait until the installation process is complete.


  3. Next you will be asked to do the XAMPP settings through the "Windows Command Prompt". Follow step 4 to 9 :
  4. Type "y" when you got the question "Should I add shortcuts to the StartMenu / desktop? (y / n): "Continue to press the ENTER key.
  5. Type "y" on the next question "Should I procedd? (y / x = exit setup): ". Continue to press the ENTER key.
  6. Type "n" on the question "your choice? (y / n): ". Continue to press the ENTER key.
  7. XAMPP is ready for use. Press the ENTER button to perform the automatic setting php.ini and my.ini.
  8. Press the ENTER button again to resume, type "x" for the question "Please choice (1-7 / x):".
  9. Finally, to end the installing process and setting XAMPP by once again pressing the ENTER key.
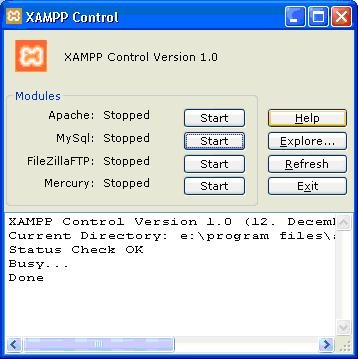
  10. After installation is complete, go to the Xampp Control Panel.

  11. Check the Apache and MySql list, then click the start button in each section as well. The result will be like this:


  12. And, Xampp are ready to use.
To check if XAMPP is running properly, try opening a browser and typing the following URL: http://localhost/

If the XAMPP select language appear, it means your XAMMP is ready to use and settings have been going well.


AppServ Installation


Installing appserv has no different way from installing xampp. To install AppServ, please follow the guidelines below:
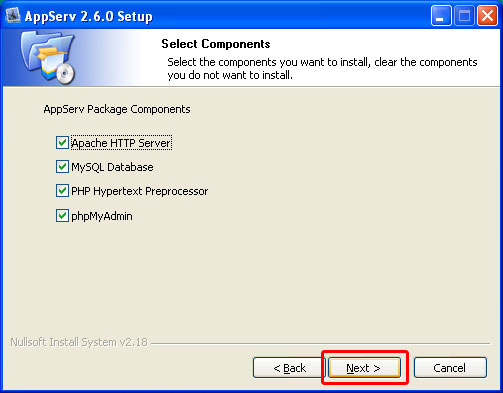
  1. Klik File Appserv yang didownload, lalu Klik Next.


  2. Click I agree.


  3. Click Next.


  4. Click Next again. :)


  5. Take this setting :
    Server Name = localhost | Email = Isikan Email Anda | Port = 80


  6. Fill in Password column with a password that you want, Re-enter the password, then click Install.


  7. After the installation process is complete, click Finish.


To see whether the installation was successful you can check via your browser and type the URL "http://localhost/". Yap, its the same way as checking the XAMPP installation. If AppServ successfully installed, it will look like the following:


That's it, how to install Local Server on our PC or Notebook. This local server will use to parse the PHP script.

In next post, we will begin to make a PHP document. Thank you all

At last, Happy Codding All. :)

Senin, 01 Agustus 2011

Installing XAMPP on Linux

To install Xampp on windows, is not a difficult thing in fact. We just follow the instruction, wait a while, and XAMPP was ready to use. However, in linux we encounter something slightly different. Maybe this tutorial for some people is easy, but for the needy, but if you having trouble to install XAMPP in your Linux, follow this instruction.

Note : In this tutorial I use Xampp for Linux version 1.7.4

Well, without much talking let's start installing Xampp on linux. :)

  1. First, download the linux version of xampp on their official website, click here to download xampp for linux version 1.7.4.
  2. Put the downloaded files .tar.gz on the desktop if it is not automatically saved on the desktop.
  3. Open a terminal (Applications> Accessories> Terminal).
  4. Go to where you store the downloaded xampp for linux earlier. (I assume you save it on your desktop, if you do not please go to the place you store it.
    cd desktop
  5. Login as super admin. (On some Linux distributions such as Ubuntu 10 you do not need to log in as super admin. You just add sudo at the beginning of each command.)
    sudo -s
  6. Enter the password if requested.
  7. Extract the downloaded files into the folder / opt.
    tar xvfz xampp-linux-1.7.4.tar.gz -C /opt
    For users of Ubuntu version 10 and above, including me:) type the following command.
    sudo tar xvfz xampp-linux-1.7.4.tar.gz -C /opt
    The above command will be extract xampp into the folder / opt / lampp.
  8. Now, we try to run the xampp with the command.
    /opt/lampp/lampp start
    or try with this command.
    sudo /opt/lampp/lampp start
  9. After the XAMPP running, open a browser and go to localhost (http://localhost) If all goes well, then we will get a language selection page of XAMPP.
  10. After selecting your language, we will automatically go to the welcome page.
  11. Now we go to the security page by clicking Security on the left menu. You will get "unsecured" status in all lists.

    If you will use XAMPP for local activities or just on a personal computer, this should not be a big problem. But, it helps us to practice to make Xampp "more secure".

    Next, let us make our XAMPP more secure.

  12. Type the following code at the terminal.
    /opt/lampp/lampp security
    Or like this if error message appeared.
    sudo /opt/lampp/lampp security
    Note : Make sure you are logged in as super admin.
  13. Type "yes" or "y" when asked to set a password and enter the password you want twice.
  14. After that, type "yes" or "y" when you are asked if you do not want MySql accessed through network. This option is optional. If you choose yes, then it will restart mysql. Please wait a moment.
  15. Then, you will be prompted to set passwords for PhpMyAdmin. Do as the previous step.
  16. And again, you will be prompted to set the password for user "root" in MySQL. Make sure the password was easy to remember, or if you forgot, this things will become a big problem. :)
  17. The next is to set a password for ftp. You could set no to this option, but it's better to keep it set even though it was not going to use latter. With this, then xampp security setting will be completed
  18. To ensure everything goes smoothly, we returned to the browser and go to localhost (http://localhost)
    You will be asked to enter a username and password.
    Enter username: lampp.
    Enter password: (as you were setting it before)
  19. After the welcome page opens, go to page security. You will see the status of each list to be "secured".
Okay at this stage, the installation of XAMPP on Linux is complete.
Next we will set the htdocs folder for easy in its use later when creating websites. From my experience, when i try to put my website folder in htdocs folder, and try to access it from browser, i got an error said that "Files not found". Well, i try this one to fix it.

Follow this step :

  1. Open a terminal and type the following command.
    mkdir ~/public_html
    Or you can easily right-click on the home, create a new folder and name it "public_html" without quotes of his.
  2. Now we create a link from public_html folder to folder / opt / lampp / htdocs. Please open a terminal and type the following command.
    sudo ln -s ~/public_html /opt/lampp/htdocs/
  3. To set the "user permissions" for the htdocs folder, reopen the terminal, then log in as super admin and typing the following command.
    chown yourusername -R /opt/lampp/htdocs
    or :
    sudo chown yourusername -R /opt/lampp/htdocs
    This command will change the owner or ownership of the original htdocs folder owner to yourusername.
    Command -R means recursive, where the htdocs folder and files and folders inside it will also be replaced its ownership.
Okay, that is it. Our XAMPP is ready to be used to design or developed website. :)
However, when we restart the computer, then we should re-open the terminal, and type the command.
sudo /opt/lampp/lampp start
If you want to run XAMPP automatically each time you boot your system, then follow these steps:
  1. Click the menu system > preferences > Startup Applications.
  2. After the Application Startup window opens, click add.
  3. Then enter this command :
    Name = Xampp
    Command = /opt/lampp/lampp start
That is it, every time you boot, xampp will automatically run.

If you want a Graphic User Interface (GUI) to run and stop XAMPP, follow these steps:
  1. Open the terminal and type :
    gksudo gedit
  2. Copy dan paste this code on your gedit.
    [Desktop Entry]
    Comment=Start and Stop XAMPP
    Name=XAMPP Control Panel
    Exec=gksudo python /opt/lampp/share/xampp-control-panel/xampp-control-panel.py
    Icon[en_CA]=/usr/share/icons/Humanity/devices/24/network-wired.svg
    Encoding=UTF-8
    Terminal=false
    Name[en_CA]=XAMPP Control Panel
    Comment[en_CA]=Start and Stop XAMPP
    Type=Application
    Icon=/usr/share/icons/Humanity/devices/24/network-wired.svg
  3. After that, save in "/home/usr/share/applications" and set the name "xampp-control-panel.desktop" to the files
  4. Now, XAMPP Control Panel will appeared at menu Applications > other.
    Clik it, and you will get a window like this one :
Okay, that's it. Congratulations and do usefull thing. :)

If there any mistake on this post, please correct me because i'm still learn.

At last, Happy Codding All. :)

Share

Twitter Delicious Facebook Digg Stumbleupon Favorites More